


The Compendium of Custom Refresh Rate Techniques in FamiTracker
Formerly: The Guide to Making NES/Famicom Dubstep in FamiTracker
Written by Dimeback
Document version: 1.3
PREFACE
This is a completely revamped version of my 2014 findings that were published in 2017, which cleans up colloquial English and reduces unnecessary jargon. A whole realm of new information on the subject has also been added. This update is long overdue, but I assure you, my peers and I will check on it far more frequently as we discover more info!
INTRODUCTION AND SETUP
Take a deep breath. There is A LOT to cover, and it will probably be hard to absorb everything in one reading session. I recommend exploring each section one at a time. Give yourself a good feel for how everything will sound as you go. This document assumes you have an intermediate-to advanced-level of understanding of how to use either jsr’s FamiTracker (shorthand reference: FT) or HertzDevil’s 0CC-FamiTracker (0CC), and Rainwarrior’s NSFPlay, which are the three main programs that will be referenced. So, if you are a novice user, please do still follow the guide as much as you can understand and give it a try nevertheless! Getting the practice via trial and error will be very beneficial, as it’ll allow you to gain a better understanding of what is going on with the techniques. However, if it seems like you’re getting nowhere with this guide so far, practice with FamiTracker more, then come back, or try to take it in even smaller steps at a time. You can also take a look at the Contact section at the bottom if you’re really stumped for help!
SECTION 1. WHAT’S A REFRESH RATE?
The refresh rate signifies how often any precise change in volume, pitch, duty, and any forms of note triggering, can occur in the NES’s audio stream. Normally this is 60 refreshes per second (or “hertz”), which means every ~16.6667 ms the audio stream will update. This is too quick for anyone to really notice the sequential changes that happen in a stream, but also slow enough to make big volume/pitch/duty sequences without taking up much space. The NSF specification has a feature called “custom playback rate” which allows you to crank up the refresh rate by a factor of three to eight times what it usually is. This can be done in FT/0CC by going to the Engine Speed option (under ‘Module’ in 0CC and under ‘Tracker’ in FT) and clicking ‘Custom…‘. The maximum value you can choose from the program itself is 400, but via text import/export, it can go as high as 800.
I may use the terms “playback rate” and “refresh rate” interchangeably. For all intents and purposes, they are the same thing. Just keep that in mind!
SECTION 2. FINDING THE RIGHT REFRESH RATE AND TEMPO SETTINGS
Depending on your workflow, you’ll have to do some math to ensure you’ll get the cleanest sound out of your module. The rate you choose will represent the highest carrier tone (more on that in the next section) you can achieve. This chart lays them out very well.
Some good ones to use are the following:
| Note | Frequency (Hz) |
|---|---|
| A-4 | 440 Hz |
| G#4 | 415 Hz |
| G-4 | 392 Hz |
| F#4 | 370 Hz |
| F-4 | 349 Hz |
| E-4 | 330 Hz |
| D#4 | 311 Hz |
| D-4 | 294 Hz |
| C#4 | 277 Hz |
| C-4 | 262 Hz |
| B-3 | 247 Hz |
| A#3 | 233 Hz |
| A-3 | 220 Hz |
| G#3 | 208 Hz |
| G-3 | 196 Hz |
| F#3 | 185 Hz |
These make for great starting refresh rates, because they’re all either exactly or very close to the actual frequencies of these notes. You don’t have to comply with these though. If you’re the type of person who likes to detune their whole song in 0CC, just adjust the refresh rate accordingly.
The following portion of this section is pretty much optional, as these conventions don’t really need to be followed. You could use whatever tempo you want, as uneven ticks are virtually unnoticeable at refresh rates this high. I still recommend reading through it, because this info will not only be handy for later sections, but required for certain techniques, such as trailing effects (more on that later).
Now for the tempo, this will depend on which version of FT you plan to use. For 0CC users, under the speed setting at the top, set it from ‘Tempo’ to ‘Fixed’. A good speed setting to use is 4, to balance out ease of workflow and high speed effects, but you are free to go higher or lower if it’s too much or too little for you. Unfortunately, this means you lose the ability to fine tune the tempo, but a few things can be done to alleviate this:
1. Grooves/Alternating Fxx effects.
2. Use more/less rows per highlight.
However, if you’re using vanilla FT, you’ll have to do extra work to get the tempo, as you can’t manually set the tempo higher than 255. This is your equation: (Refresh rate * 2.5)/(Desired speed setting).
Example: (392 * 2.5)/4 = 245 <— This is your tempo value.
Where does the constant 2.5 come from? Incrementing/decrementing the refresh rate by 1 Hz changes the tempo by 2.5 BPM, respectively.
Keep in mind, the final value must be below 255, so if, for example, division by 4 results in a value > 255, divide by 8 instead.
(415 * 2.5)/4 = 259.375 ❌
(415 * 2.5)/8 = 129.6875 ✅
This equation will not always result in an exact number, and there is no way to enter this kind of value into the tempo setting on vanilla FT. In this case, round up or down to the closest whole value. In most cases, a speed setting of 1 is recommended for vanilla FT.
SECTION 3. ADJUSTING YOUR WORKFLOW
This is probably the hardest part for people when it comes to getting into making high refresh rate music. If you’re like most people, you probably compose in such a way that each individual row dictates the tempo. So naturally, 150 BPM at speed 6 = an output of 150 BPM. Or perhaps you double it if you need more row space for effects and notes. You probably also rely heavily on instruments and their sequences. When you increase the refresh rate, especially by a large factor, sequences playback much faster, which means they will have to be longer to get the same result you got at 60 Hz. You can still make sequences in this manner, but if you’re trying to make a very long (at least 3 seconds or more) sequence, achieving that will most likely be impossible now.
But there is another way, and it involves using the volume and effect commands in the pattern editor instead of instrument sequences. A handy tool called NSFImport can take any .nsf file and convert it into a full speed (150 BPM at speed 1) stream of FT pattern data. In these modules, the rows scroll by very fast, and only one blank instrument is used. Instead of the various instrument data being stored in sequences, they’re created using the volume table and various effects. At first glance, the pattern data may look cryptic, but if you look closely, each distinct note has a consistent row separation between them all. For example, if new notes typically happen after six rows, that means the speed of the song is 6, if it were to be made as a conventional FT module. Most songs imported into a module via NSFImport can easily be recreated with a more familiar pattern presentation. This can be done by finding the row separation between each distinct note, and matching that to the speed setting in your module.
SECTION 4. CARRIER TONES: HOW TO USE SEQUENCES WITH HIGH REFRESH RATES
By now you’ve hopefully picked out a refresh rate to use. If not, we’ll use 392 Hz as an example. The easiest way to get a surface level understanding of how this all works is through the instrument sequences. Start by making a volume sequence {| 15 0}, then hit a few notes on your keyboard. On top of the normal frequency you’ll hear, you will also hear a constant bass frequency (carrier tone). In the case of this sequence, it’s a G-2. In the sequence editor, if you increase the size of the sequence, you will hear the carrier tone descend in pitch. The bigger the sequence, the lower the pitch gets.
Here’s a chart that shows what pitch you will get based on the size of the sequence. x = the note set by the refresh rate; the negative number by semitones:
| Sequence | Output note | Volume string in the shape of a square wave: |
|---|---|---|
| 2 steps | x | 15 0 |
| 3 steps | x-7 | 15 0 0 |
| 4 steps | x-12 | 15 15 0 0 |
| 5 steps | x-16* | 15 15 0 0 0 |
| 6 steps | x-19 | 15 15 15 0 0 0 |
| 7 steps | x-22* | 15 15 15 0 0 0 0 |
| 8 steps | x-24 | 15 15 15 15 0 0 0 0 |
| 9 steps | x-26 | 15 15 15 15 0 0 0 0 0 |
| 10 steps | x-28* | 15 15 15 15 15 0 0 0 0 0 |
| 11 steps | x-29 | 15 15 15 15 15 0 0 0 0 0 0 |
| 12 steps | x-31 | 15 15 15 15 15 15 0 0 0 0 0 0 |
| 13 steps | x-32 | 15 15 15 15 15 15 0 0 0 0 0 0 0 |
| 14 steps | x-34 | 15 15 15 15 15 15 15 0 0 0 0 0 0 0 |
| 15 steps | x-35 | 15 15 15 15 15 15 15 0 0 0 0 0 0 0 0 |
| 16 steps | x-36 | 15 15 15 15 15 15 15 15 0 0 0 0 0 0 0 0 |
*Slightly out of tune
With a refresh rate of 392 Hz, this is the table of notes we would have:
| Sequence | Output note |
|---|---|
| 2 steps | G-3 |
| 3 steps | C-3 |
| 4 steps | G-2 |
| 5 steps | D#2* |
| 6 steps | C-2 |
| 7 steps | A-1* |
| 8 steps | G-1 |
| 9 steps | F-1 |
| 10 steps | D#1* |
| 11 steps | D-1 |
| 12 steps | C-1 |
| 13 steps | B-0 |
| 14 steps | A-0 |
| 15 steps | G#0 |
| 16 steps | G-0 |
The great thing is that if you adjust the refresh rate, you will get a different set of notes to work with. Here’s the chart again at 350 Hz:
| Sequence | Output note |
|---|---|
| 2 steps | F-3 |
| 3 steps | A#2 |
| 4 steps | F-2 |
| 5 steps | C#2* |
| 6 steps | A#1 |
| 7 steps | A-1* |
| 8 steps | F-1 |
| 9 steps | D#1 |
| 10 steps | C#1* |
| 11 steps | C-1 |
| 12 steps | A#0 |
| 13 steps | A-0 |
| 14 steps | G-0 |
| 15 steps | F#0 |
| 16 steps | F-0 |
It’s very similar to how the DPCM pitch levels work, in that the bigger the sequences gets, the finer the tuning gets.
2A03 BREAKDOWN
In the following two sections, we will cover the basics on how to apply instrument sequence and effect techniques to each of the five 2A03 channels. It’s probably the hardest one to understand in its entirety, even out of all the expansions. Presently only the 2A03 will be covered, but many of the tricks here can feasibly be applied to other expansions without much more explanation (such as MMC5 and VRC6)!
SECTION 5. APU1 (2A03 PULSES)
The 2A03 pulses are incredibly versatile for high refresh rate tricks. Each instrument sequence can morph and modulate the carrier tone in their own unique ways. Arp and pitch sequences can be used to get gritty leads (much like fast vibrato leads in LSDj) and noisy bass sounds by altering the pitch by large amounts on every step. The 2A03 pulses also have a special property to where a pitch change that alters the most significant bit of the frequency register causes a phase reset (A side effect of this feature is often found in modules with a vibrato command with large depth placed on an A-3, which causes an unpleasant clicking sound, due to the that note’s frequency being extremely close to a MSB boundary). This can be taken advantage of by arp and pitch sequences to make a really cool metallic sound at the highest carrier frequency, even higher than volume sequences allow.
Duty cycle sequences can also be used to get gritty leads and basses, as well as increase the gain of the instrument if any other sequences are being used, with 12.5% having the lowest gain, and 75% having the highest. Yes, there’s a difference between 25% and 75%! On that note, you can also get a gritty phase reset style effect with the duty sequences by alternating between 25% and 75% very quickly, since on their own, they do sound pretty much the same, but the waveforms are much different, so switching between the two creates a similar effect.
On the subject of duty cycles, there is a trick to get smooth PWM on carrier tones. This is done by making a looped volume sequence in the shape of a square wave, setting the duty to 50%, and playing the note that matches the carrier tone’s frequency at a slight detune (At 392 Hz, a volume sequence of {| 15 15 0 0} would require a G-2).
To keep your carrier sounds clean, I recommend using pitches that are in the overtone series of the refresh rate you’re using. If you play around those pitches on your keyboard, you will notice how much cleaner they sound at those frequencies. That’s because the frequency of those pitches lines up with the frequency of the carrier tone by a certain multiple.
SECTION 6. APU2 (TRI+NOISE+DPCM)
Unfortunately, the triangle does not have the same potential as the pulses, and is much harder to use due to FT’s poor emulation of it. However, it does have its own set of tricks that sound great when done right. For starters, volume sequences will not work for achieving carrier tones like with the pulses, even when strictly using the overtone pitch series. However, it can be used to get nice growling sound. If you’ve ever heard the game over theme in Journey to Silius, there’s a distinct 240 Hz growling effect done at the end with the triangle channel. A similar effect can be achieved with looped volume sequences, but with more variability and finer control, depending on the refresh rate being used. Basically, looped volume sequences on the triangle are best served for FX rather than melodic applications.
| APU1+APU2 | APU1 only | APU2 only | Source file |
|---|---|---|---|
| .0cc |
However, pitch and arp sequences still have viable melodic use. The sequence sizing works in the same way as with the pulses, but the shapes and tones you will hear will be vastly different than that of the pulses. Since the triangle’s phase never resets, it’s capable of FM synthesis! Though it isn’t exactly like the FM synthesis you’re probably used to, as we’re using a triangle instead of a sine, and you have much more control of the shaping. Don’t get too overjoyed though, because this still requires a lot of testing on the hardware end to ensure it will sound good, and the output will be strongly affected by potential slowdowns (explained in Section 10). Typically, higher frequencies will play nicer on hardware, so try to use those as often as possible!
The noise shares commonalities with both the pulses and the triangle. It features the same level of volume control as the pulses, so volume techniques are possible on the noise. (Side note: Playing the highest noise pitch is actually a really good way to test the frequencies of your carrier tones!) It’s also capable of two different modes of noise, and we’ll go over how both modes fit in with refresh rate tech. Being that the regular white noise mode doesn’t have a melodic timbre, it doesn’t really have any melodic use, so complex sequences are a very uncommon occurrence in this mode. One good use of arp sequences is to have a looped sequence that makes rapid adjustments between two or three frequencies that are right next to each other, which can create a smooth, wind-like sound effect, or a faux noisy filter.
Now for the second mode, a looped metallic sound (a.k.a. periodic noise)—this actually does have some melodic use. Arp and pitch sequences can be used in a matter here very similar to the pulses to create pitches, or notes, that normally wouldn’t come out of the noise channel. The end result is a very gritty, electric guitar type sound. You should avoid making extensive use of the four lowest frequencies, as while you may get some incredible sounds from them, they will not translate over well to hardware.
Aside from that, one more useful trick for the noise channel is to have a looped mode sequence which rapidly switches between the two. It can give your percussive instruments a more electronic sound. The noise channel has a lot of potential, but due to its importance in making good drums/percussion, the more melodic tricks are much harder to fit in.
The DPCM channel surprisingly doesn’t change much with higher refresh rates. All effects function the same except for one: The Xxx effect. This effect causes a sample to retrigger for the amount of ticks set by the effect plus one. This means that a value of X03 = retrigger every 4 ticks, X07 = retrigger every 8 ticks, etc. One great thing about this effect is that the values themselves don’t even have to match up to the pattern speed. All that matters is that you trail each Xxx effect (more on trailing effects in the next section) that occurs after the sample until you want it to end.
TRAILING EFFECTS
SECTION 7. TRAILING EFFECTS, PART 1: THE Gxx EFFECT
There’s a very simple trick that can be done to unlock a whole new flavor of sounds at your disposal, and can also save you some space on instrument sequences as well. If you’re using both 2A03 pulses to do refresh rate tricks, you may want to use a sequence from one pulse channel on another, but offset slightly. If you don’t know, the Gxx effect normally works by delaying the data of the row it’s on by the number of ticks set by the refresh rate. At 60 Hz, a G01 effect would represent a delay of 1/60th of a second, or a 16.66 ms delay, A G02 would be a 33.33 ms delay, and so on. Now, what if we had something like 220 Hz? That would give a G01 effect a delay of 1/220th of a second. This also means that at 120 Hz and 150 BPM, the tick resolution is double of what it normally is, because 120 Hz is 60 Hz doubled.
For example, using Gxx for triplets at speed 6 is normally done like this:

But at 120 Hz, it would look like this instead:

But if you were to use something like 321 Hz at 150 BPM, neither of these would work, as the ticks per row would be different, and most likely uneven.
Now, the Gxx effect isn’t just useful for triplets. Let’s say you want to have a sequence like this:

With the following volume sequences per instrument:
Instrument 00: {| 15 0 0 0}
Instrument 01: {| 0 15 0 0}
And the resulting output:
Pulse 1: 15 0 0 0 15 0 0 0 15 0 0 0 ...
Pulse 2: 0 15 0 0 0 15 0 0 0 15 0 0 ...
Instead of using a whole new volume sequence and instrument, you can just set a G01 effect on one of the channels (pulse 2 in this case), and you get this:
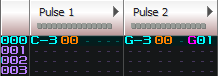
Assuming the same volume sequence as above, the resulting output would be this:
Pulse 1: 15 0 0 0 15 0 0 0 15 0 0 0 ...
Pulse 2: . 15 0 0 0 15 0 0 0 15 0 0 ...
Not only have you saved yourself some instrument space, but you can change the sequence offsets just by altering your Gxx value, and it can be applied on either channel!
SECTION 8. TRAILING EFFECTS, PART 2: PHASE RESETTING
You’ve probably been tinkering around with the 2A03 pulses long enough to realize that a lot of the sounds you’re making are pretty messy. There aren’t a lot of techniques that can be done to make it sound better, and some won’t even work on an NSF. Having to stick to pitches in the overtone series can seem pretty limiting to an already limited set of carrier tones, but there is one thing you can do.
The 2A03 pulses have a special feature called “hardware sweeps”. It works much like the software pitch sweep effects (1xx and 2xx), but it’s controlled directly from the 2A03 chip, so it works on its own clock. This feature can be accessed through the Hxy (sweep up) and Ixy (sweep down) effects in FT and 0CC, and can only be used on the 2A03 pulse channels. However, if you leave the x and y values as zeros and put it after a note begins playing, you will hear a very subtle click in the output. What happens here is the waveform’s phase is being forcibly reset, and if you hear a click, that means it was reset before completing a full phase.
Remember when I mentioned the importance of using fixed/calculated tempo? Doing so ensures that all ticks per row are equal. With that in mind, if you input a column of H00’s or I00’s starting from the initial note and listen to the output, you will hear a buzzing tone with a constant pitch on top of the tone produced by the note. If you combine this with an instrument containing a sequence that matches the global speed (for example, in 0CC, this would be a sequence that’s four frames long, with a global speed of 4), you get a much cleaner sounding output than what you were probably getting before. It pretty much eliminates the need to stick to the overtone series, and makes fine pitch slides much more viable. This all would look something like this:
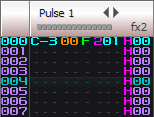
Now, let’s back up a bit. Remember what we learned about the Gxx effect? It can be applied in the exact same way here:
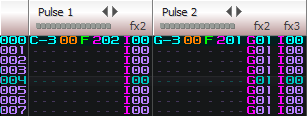
If you don’t quite understand, the reason it’s necessary to also trail Gxx effects here is so that the trailing I00’s trigger at the exact same interval as the initial note, which has a G01 effect on it. This means all subsequent I00’s also need a G01 effect.
HARDWARE AND NSF TESTING
SECTION 9. OPTIONS FOR PLAYING YOUR NSF
It is highly recommended to export your module as an NSF and listen to it in NSFPlay. The biggest flaw of writing music in any version of FT is lack of direct hardware access/accurate emulation. It will give you a good idea for how things should sound, but when it comes time to export the module as an NSF and play it in NSFPlay, you will find that many things sound different, and at worst, terrible (sequences with a length base of 3 are notorious for not playing nicely with an exported NSF). One notable example is PWM tricks. In FT, it sounds rough and has a low resolution like VRC6 PWM, but in the NSF it sounds smooth, almost like C64 PWM.
If you are willing to put in the investment to get a proper sound, getting real hardware would be a great next step. Your NSF can be played back on NES hardware via a RetroUSB PowerPak. The only drawback to using real hardware is that you don’t have control over the panning and volume of each individual channel like you do in NSFPlay. This can be somewhat alleviated by performing a hardware mod that separates the two audio signals coming from the system’s chip (popularly known as the “stereo mod”), but it will only do so much, so if you’re fine with mono audio, I’d recommend not doing this.
SECTION 10. MY NSF KEEPS SLOWING DOWN!
If you’re running into this issue you’re probably using an expansion chip, or a very high refresh rate (600 and above). Doing either of those adds an enormous load to the NES’s processor (hence why the term “overclocking” is a misnomer). Instrument sequences (especially looping ones) also contribute to the issue. On top of poor hardware emulation in 0CC and FT, there is no indicator of how much of a load you’d be putting on the CPU. This means having to run many tests on the NSF. There are a few methods to fix these issues, ordered from biggest difference to smallest:
- Half the refresh rate. (Ex: 415 → 208)
- Use an expansion chip with less channels. If you’re using 8-N163, use 4 instead or switch to VRC6.
- Transpose your song down a half-step or whole (and adjust the refresh rate accordingly)
- Don’t use every channel at once.
- Remove instrument sequences or sparse their usage. Make sure you’re not using a bunch simultaneously.
- If you’re using 0CC, convert the module to work in FT, as it has a smaller driver size.
Each of these decisions comes with drawbacks, and sometimes you may really not want to sacrifice anything, or you’ll do whatever you can to avoid making a significant change, especially if you’re really far into a module. It’s up to you on whether you want to weigh your options, or continue to balance compositional power and CPU usage. I’d say it’s certainly more fun doing it that way ;^)
There’s a certain point at which slowdown effects will start to be noticeable as you increase the refresh rate, and it’s different in FT and 0CC. Here are some guidelines based on my findings so far:
| 0CC | FT | |
|---|---|---|
| 2A03 only | ~645-655 Hz | Untested, probably ~680-690 Hz? |
| With VRC6 | ~370-380 Hz | ~390-400 Hz |
| With N163 | Untested | ~230-240 Hz* |
*6-N163
It should be also noted that some versions of NSFPlay are more prone to experiencing slowdown that may not even occur on hardware playback. NSFPlay 2.4 fixes this issue and is the recommended version to use.
SECTION 11. WHICH VERSION OF FT IS RIGHT FOR YOU?
The answer depends. This is a decision that you must settle on upon creation of your next module. 0CC and FT handle NSFs differently, even if the module works in both versions. They will not sound the same. In the end, it’s all about adjusting everything in the module until the NSF sounds how you want it to. From my experience using both versions, there are some crucial advantages and disadvantages between each version:
| FT 0.4.2 | 0CC-FT 0.3.14.5 | j0CC-FT j0.6.1 |
|---|---|---|
| + Smaller driver size, which makes NSFs slightly less prone to slowdown. | + A bunch of new features, some of which are helpful when using refresh rate tricks (such as fixed tempo, which allows for >255 BPM). | + A fork of 0CC-FT 0.3.14.5 that fixes major bugs found in that build, along with additional minor quality-of-life enhancements. |
| + Refresh rate setting can be changed while song is playing in program | + Maximum of 256 frames per song. | + N163 FTI instruments can be exported without crashing, and color scheme I/O works. |
| - Key UI improvements brought by 0CC are absent here. Workflow will usually be messier and take more time. | + Mixer settings which can account for the volume difference on stereo modded NES’s. | + Doesn’t corrupt memory when entering MML volume sequences over 252 items long (instead truncate). |
| - Maximum of 128 frames per song. | - N163 workflow is prone to crashing, and color scheme I/O is bugged. | + Typing Pxx (or FDS Zxx) defaults to P80. |
| - Maximum tempo value of 255. | - Bigger driver size, which makes NSFs slightly more prone to slowdown. | + N163 wave editor’s copy/paste buttons copy all waves at once, separated/terminated with semicolons. This allows for highly efficient Audacity-N163 import workflows. |
| - No mixer settings. | - Song must not be playing to change refresh rate. | + At the time of this page update, development is still ongoing. |
Things to keep in mind:
- FT 0.4.2 and 0CC-FT 0.3.14.5 are old versions of each program, and attempts to contact the authors have been unsuccessful overall. They are the most stable versions, though.
- Certain parts of the UI are arranged differently between the two programs.
- Some quirks behave differently, such as selecting frames in the frame editor.
Again, it’s up to you which version you want to use. Learn to exploit the advantages of your program, and live with its disadvantages.
CONCLUSION
Even with a text guide on how to take advantage of these tricks, the results you get at first may be either disappointing or an epiphany. We can only give you so much tutelage, nor is spoonfeeding source material (be it in the form of .nsfs or .ftms/.0ccs) an effective measure for instant gratification—you need to observe & practice these techniques with an active learning mind and patience if you want to achieve results similar to what you aspire to reach with Wandering Floor and MoeNES. The experience is essential!
Remember that if you’re struggling with a particular section or don’t understand something, focus on it and keep experimenting. You can only learn so much about audio techniques by reading a wall of text. And once again, if this is all going way over your head, just keep practicing with FamiTracker in a way that is most comfortable for you. Learn all of the effects and what every feature does, memorize them, and then come back to this guide and take your time. One thing you can try is to make backups of existing .ftm’s/.0cc’s and analyzing their techniques thoroughly (those that use a speed of 1 are highly recommended)!
EXTERNAL LINKS
- Making use of overtones in LSDJ’s WAV channel (also applicable to N163 and FDS)
- PAUL’S TECH TALK – LSDJ 5.3.5_4X PART 1: OVERCLOCKING AND DUAL OSCILLATOR THEORY
- More complete technical overview of the 2A03 soundchip (advanced terminology lies ahead, tread with caution!)
CONTACT
Encountering curiosities within your journey so far? Come chat with us on Twitter and Discord! We’ll be happy to assist:
Dimeback: @tencentsback | Dimeback#9396
kipptune: @kipptune | kipptune#2403
Aquellex: @Aquellex | Aquellex#3071
SPECIAL THANKS
- jsr, for developing the original FamiTracker and allowing anyone to easily create authentic NES music at home for free
- chibi-tech, for blowing away the world with Moe Moe Kyunstep Part 2 and inspiring many people to experiment further with refresh rate tricks within FamiTracker
- The curators of famicompo pico, for their help with keeping the global NES music scene alive and well, and giving an outlet for discovering many great artists
- RetroZone, for developing and producing the PowerPak cartridge
- loopy, for developing the PowerPak NSF player, allowing us to play NSFs with custom refresh rates on the real hardware
TODO
- Documentation of expansion chips (most likely candidates as of now: VRC6, N163, FDS)
- Append more image & video examples
- Await feedback & append a FAQ as appropriate
- Talk about triangle linear counter (Sunsoft 240hz growl; S81, S82, S83 effects in 0CC)
- TNS-HFC5 and TNS-HFX4 and using the PowerPak in tandem with real carts with expansion audio (need testing still for MMC5, VRC7, Sunsoft 5B)
- Add more links to source FTMs to showcase what you can achieve with musical context
- Go more in depth with proper Gxx spacing in regards to arps, odd row highlights, speed/tempo and how they’re connected
DOCUMENT CHANGELOG
- 1.1 - Initial release.
- 1.1a - Added examples.
- 1.2 - Major overhaul! Title changed to The Compendium of Custom Refresh Rate Techniques in FamiTracker. kipptune’s Special Smoothie was appended to examples.
- 1.3 - Appended info regarding the 2.5 constant for the tempo equation in Section 2. Minor typography errors were fixed in the same section as well. Appended Journey to Silius example in Section 6. Noted down color scheme I/O issues 0CC vs. j0CC. Added more frequencies to the frequency table in Section 2.
EXAMPLES
| Track name | Composer | Audio | Source files |
|---|---|---|---|
| Adrenaline Rush | Dimeback | .ftm .nsf |
|
| Blitter Spitter | Strobe (TiTAN) | .ftm .nsf |
|
| Spacial Smoothie | kipptune | .ftm .nsf |
|
| Wub Club | Dimeback | .ftm .nsf |